Monday, December 31, 2012

Happy New Year, Punksters!


Hey Punksters!  This week Punky Sprouts is having a blog hop to celebrate 2012 and ring in 2013.  Each member of the Design Team are showing you some fun projects for your party or just for fun!  Hop along with us, leaving comments at each blog to enter to win a great Punky Prize Pack!  You could win an album of your choice along with Punky embellishments and a Lindy’s mist! 

Here is my project using Punky Sprouts embellishments!  It is super easy and a fun way to make a decorative ornament to hang for your party!

 Supplies:  2 pkg's of Lil' Blossoms Parchment, 1 pkg of Lil' Blossoms Lacy, Lil' Twiney (or any twine or thread you choose), Glitz Spritz (I used Royal Amber Fire), liquid glue or glue dots ( I used large Zots), decopauge, glitter, beads, scissors and a paint brush.  For this demo, I will use 2 small Lacy Blossoms and 8 small parchment Blossoms.  You will repeat each step with the same quantities of medium & large Blossoms.

 The first step is to apply decopauge with a brush to the outside border of the doilies.  You will need 2 doilies in each size (small, med, large).  then sprinkle with glitter.  I love the clear glitter, but you can use any color you choose!  Trick - pour glitter over a coffee filter so that it is easy to catch the extra glitter and pour it back in the bottle.  


 Next, apply about a nickel sized spot of glue OR 2 large zots to center of the Lacy blossom. Pinch it in the center to pucker it - the glue will hold it together.  Gently flatten it back out.


Next, glue dot 4 of the parchment blossoms to the center of the puckered Lacy Blossom of the same size.  Layer them right on top of each other.  In the pictures, I am using the small doilies and the small parchment blossoms.


Begin to pinch and scrunch each Parchment piece pulling up and toward center.


 When all 4 layers are pinched and puckered, you can "fluff" them up with your fingers to make the ornament more like half of a ball.  Repeat these steps for the other half of the ball!

 When you have both sides complete, join them back to back threading your twine between them.  I placed mine with large at top in descending order. I used a large zot on the back of each half and layed the twine on the zot to make sure it was secure and centered.  Leave enough twine at the top to loop for hanging and enough twine at the bottom to dangle your beads and bling!  When you have them all secure, spritz with Glitz  Spritz (by Lindy's) and apply more glitter if desired.

String beads or any bling you choose to the bottom and hang!  Another idea would be to continue stringing together to make a garland...!
 I hope you like this idea and run with it!  These "half balls" also make great package decorations in place of a traditional bow.  All Punky Sprouts products used in this project, as well as Lindy's Mist Sprays are available here: http://getpunkysprouts.com/   Good luck!  Be sure to visit and comment on each of these blogs to win a Punky Prize Pack!!  Here’s the order of blogs in case you get lost along the way.


Punky Party Rules-Leave a comment on each designer’s blog and then on the Punky Sprouts blog to be entered to win the Punky Prize Pack.  Comments must be posted by midnight, Friday, January 7th PST to be eligible for the random drawing. 


Wednesday, December 12, 2012

Warm Winter Wishes


Warm Winter Wishes

Hi there! It's Shelly here wishing everyone a happy holiday season!  During December Punky Sprouts has swapped products with one of my VERY favorite manufacturers, My Little Shoebox! I was lucky enough to get the Secret Garden line, which has classic calico florals, polka dots & stripes in blues, yellows, pinks!  I love the MLS designs, as they exude nothing but happiness and joy...LOVE!  
So, while no snow has fallen outside where I live, I put plenty of snow on the holiday decor plaque I made for my door.  I used a 12" x 12" corrugated Punky Playground for my base and blue polka dot paper for the sky background.  Then I cut the cute prints into houses, roofs, doors, chimneys, etc.  Literally, the row of houses is all pieces I cut from the many prints in this line.  


I used Collage Pauge to adhere all the paper elements.  Then I used stamps, paint and markers to add detail and texture to the scene. To create the "snow" border,  I mixed an acrylic texture medium called White Opaque Flakes with a touch of white acrylic paint and applied it around the edges and below the row of houses.  Then I added a swirly title out of the cardstock stickers from MLS.  FUN project!   Don't be afraid to go outside your "box." This is all pieces of paper and cardstock stickers for the title.  I just used markers to outline everyone and a few stamps for highlighting the details.  Christmas Cheer!

Friday, November 16, 2012

Stepping out of my comfort zone....

Hi!  Shelly here....So, if you know anything about me, you probably know I LOVE creating just about anything, but particularly, mixed media.  Though in all my years of creating and designing mixed media mini albums, I have never actually painted my own sketched drawing...I've never sketched!  I have been an admirer of those whimsical painting styles for years and Christy Tomlinson is one of my fav's.  SOOOOOOOO - when I saw that she was offering a new class called Whimsy Winter I jumped at the chance!  So here is the step-by-step process of my first painting.  Don't hold your breath - mine is nothing to write home about, but the entire learning process has been very satisfying and freeing...

This first painting happens to be of a reindeer, which I painted onto the back page (chipboard square) of the Rebel Sprout mini album. When I was practicing sketching these winter characters (owls, penguins, snowmen, etc.), the reindeer was definitely the most difficult for me.  As it turns out - I love it!  I have LOTS more to learn and skills to practice...hopefully this and the next several posts will show progress!


Sunday, October 21, 2012

SPOOKY - some Halloween fun!

I was playing around today thinking I need to replace the summery wreath on my front door, so I decided to use some Punky Playground (by Punky Sprouts) to make a Halloween sign!  I really wanted to make it mostly purple and had some Lindy's Stamp Gang mists to make it gorgeous!  I had some  paper left over from last Halloween with a white background embossed in a black Damask pattern.  I sprayed the paper with both Wicked Witch Purple and Amaryllis Burgundy mist sprays to get this deep aubergine shade....LOVE!  I cut one sheet of Punky Playground in half, making it 6" x 12" and sprayed it with Toto's Tornado black mist.  After it dried, I sprayed another coat of black mist using a mask in a diamond screen pattern and while the mist was still wet, I coated it with Lindy's Embossing powder in Midnight Copper Obsidian.  I didn't worry too much about the pattern being perfect, as I wanted it to appear old and grungy. I continued the diamond pattern embossing around the perimeter of the corrugated Playground piece.


I got out a big bin of chipboard letters than I have collected over the years and picked non-matching letters to spell "Spooky"and misted them with Red Hot Poker Orange, which is a perfect vintage orange with a gold shimmer.  When everything was dry I began to adhere to the backpiece and added some distressed black dots that I stamped onto the letters randomly.  I embellished with a spider web, spiders and glitter dots by Jolee's boutique and added black satin ribbon for hanging and inked all the edges in black. .

Here is a comprehensive list of supplies:

Surface corrugated board:  Punky Sprouts

All color/mists by Lindy's Stamp Gang: Flat Fabio's in Wicked Witch Purple and Toto's Tornado Black; Starbursts in Amaryllis Burgundy and Red Hot Poker Orange; Embossing Powder in  Midnight Copper Obsidian.

Paper:  Pink Paislee Phantom collection

Other:  Spiders/Web and accents by Jolee's Boutique, Ink: Pitt Big Brush Marker in Black; Adhesives:  Beacon 3 in 1 and Thermoweb; Chipboard letters & satin ribbon - stash.

Wednesday, September 26, 2012

Hood River Harvest Fest - Celebrating Autumn!


For September I made a fall mini album celebrating the amazing bounty of the Columbia River Gorge!  It's become a tradition over the past 15 years to attend the annual Hood River Harvest Festival and enjoy arts & crafts, food and a huge array of orchard fruits, nuts and veggies to fill your trunks and your tummies! Fall is my favorite season and all of the rich golds/oranges and reds and browns in the Lily Bee Autumn Spice line is absolute perfection!  The Tutu Punk mini album is a perfect choice when you have mostly horizontal photos and the wet media paper pages are so wonderful to paint!  The paper does not bleed, so I used a completely different color scheme from front to back without any problems with bleeding whatsoever!  Whoo hoo! LOVE that!  I hope you enjoy ~


Products used -


Punky Sprouts:  Tutu Punk album, Funky Punky Fiber Pack (Canvas), Lil' Petals (Canvas & Cork), Lil' Blossoms (Parchment & Lacy), Lil' Seeds (assorted). Products available here: www.GetPunkySprouts.com/store


Lily Bee:  Autumn Spice Collection pack with ABC Stickers and Mixed Stickers


Other:  Lindy's Starburst Sprays (Bayou Boogie Gold, Red Hot Poker Orange, Cajun Carnelian Red, Tainted Love Teal, Opal Sea Oats, Cattail Copper Brown, Amaryllis Burgundy); Lindy's Moonshadow Spray in Gossamer Gold; Lindy'd Flat Fabio in Witch's Purple; Fiskars edge punch; Miscellaneous chipboard letters (stash); Faber Castell Pitt pen in Black superfine.  Lindy's products available here: www.GetPunkySprouts.com/store

Wednesday, September 19, 2012

Evi Violet

Introducing, my newest furry love, Evi Violet.  She is a beautiful 4 mo. old British Shorthair kitten.  What little girl doesn't love tulle?   I haven't been able to get very many good pics of her face, as she is very active and blinks with the flash.  She has the prettiest copper eyes and they need to be shown...she just isn't very cooperative!  She is a sweetheart with a very loud purr and the softest fur I've ever felt.  It is fun watching her grow (though too quickly) and each week brings a new stage!  Currently, she is in the "don't touch me" stage. Who knows what next week will bring?  More pictures will surely be in the future.  I thnk she actually takes after her "sister," Lilley!  

Thursday, September 6, 2012

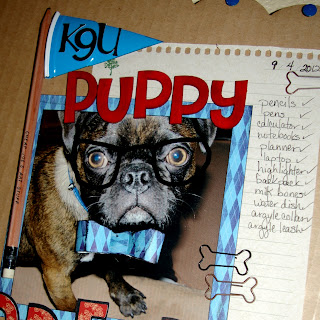
Puppy Preppie!


This summer my daughter adopted a puppy.  Anyone who knows me knows how much I love my pets and having a grandpuppy is no different!  I have taken dozens and dozens of pics of him in the 2 months she's had him and grandma gets to puppy sit on the weekends! Here is the little cutie in the first layout I've done of him.  I made this for the Punky Sprouts September blog challenge.  If you want to play along, check out the prize here http://getpunkysprouts.blogspot.com/.  So here is my "reduce, reuse, recycle or upcycle" layout using notebook paper, a pencil, thumbtacks and a piece of a plastic cup for my layout.